Floor Refinishing Gives New Life to Tired, Damaged Floors

Floor refinishing breathes new life into tired, dated or damaged floors. It involves sanding, staining and sealing the flooring.

Before undertaking the task yourself, you should carefully evaluate your hardwood floors’ condition. This includes assessing the type of floor, how worn the wear layer is and whether or not refinishing will be successful. Contact Floor Refinishing Westchester NJ now!

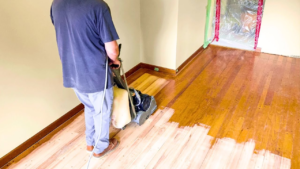
The sanding process is the most time-consuming part of floor refinishing. It involves sanding the entire floor with progressively finer grit sandpaper until the wood is smooth and ready for staining. Professionals use a drum sander to sand the main area of the room, and an edger for the edges and corners. They might also use a palm sander for any difficult spots. The sanding process leaves behind a lot of dust, so it’s important to wear protective gear for your eyes, ears, and lungs. It’s also important to vaccuum the floors and sweep them regularly as you work. The floor should be completely free of furniture and other objects before you sand, and it’s a good idea to cover outlets, vents and doors with plastic tarps.

Once the floor is sanded, it’s ready for staining or polyurethane. Stain gives the wood color, and if you want it to look richer, it’s best to mix two or more different stains together. Then you can brush the mixture into the corners and edges of each board to even it out. After the stain dries, you can re-sand and vacuum the floors. This is an excellent opportunity to make sure the sanding job was done properly.

After the floor is sanded, you should be able to see the natural wood grain through it, and it should be a nice even color. If the floor has been covered with any kind of wax, you’ll need to remove it by hand or with a chemical stripper before you refinish the floors. Be very careful around the heating grates and any tack strips that might be sticking up, as they are extremely flammable.

Then vaccuum the floors and sweep them again, then use a buffer or pad with a high grit screen to buff the floor once more. The sanding and buffing step will help to eliminate any scratches that might be left from the sanding, and it also helps to even out the transition between the sanded areas and the un-sanded sections of the floor. This is a great time to make sure you’re happy with the color of your floor, and you should have it sanded and buffed a minimum of three times before applying the polyurethane.

Staining

As a homeowner, refinishing your hardwood floors can add years to their lifespan. But even the most beautiful of floors will eventually wear out, and that’s when it’s time to refinish.

Refinishing involves removing the old finish and sanding the wood again. It’s important to use low-VOC sanding materials and let each coat dry thoroughly before applying the next one. The sanding process also removes the grain of the wood, making it smooth and even.

Once the sanding is done, the staining begins. This can be a tricky step, but it’s essential for getting the look you want. Staining isn’t just for color – it can also be used to cover up scratches, dents and other imperfections on your wood floor.

When it comes to choosing a color for your floors, there are endless possibilities. If you’re a little confused about what colors would work best with your home, consult a specialist to get advice.

After the stain is applied, it’s important to wait a few hours for it to dry. It’s also helpful to sweep up any remaining dust on the surface, as it can interfere with the final finish.

Staining your hardwood floors is a great way to add a pop of color and update the look of your entire home. Whether you’re looking for something subtle or bold, there are endless options available.

Before you decide to refinish your floors, it’s essential to determine what type of wood they are made from. Different types of wood have unique refinishing needs, and some cannot be refinished at all. You should also be aware that refinishing your floors might not be the best solution if they have already worn down to the point where they’re showing signs of rot or extreme wear and tear.

If your floors are in this state, resurfacing might be the better option. Refinishing is a much more cosmetic process, while resurfacing tackles structural damage and other issues. It’s important to have a professional assess your floors before deciding on which type of refinishing is the best option for your wood flooring.

Sealing

When done correctly, floor refinishing can make decades-old hardwood floors look like they were just installed. It’s a great way to transform old, dated flooring into a modern design aesthetic that is still warm and inviting. Refinishing is typically less expensive than replacing floors and can be completed in much less time, making it an attractive option for homeowners looking to upgrade their home’s appearance.

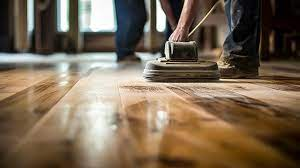
The first step of floor refinishing is sanding. This process removes the existing finish from the wood and prepares it for a new coat of stain. Professionals use a drum or belt sander and a dust mask to complete this task. They also carefully follow the direction of the grain to avoid damaging the surface of the wood and ensure a smooth finish. The sanding process can be tedious, but it is essential to the success of the final product.

After the sanding is completed, it is crucial to clean the entire area thoroughly to remove any debris and dirt. Then, the floors must be completely dried before sealing them again. This process can take a few days, so it is important to plan ahead and have all the necessary materials.

It is important to use a water-resistant sealer, as moisture can damage the wood. The sealer should also be compatible with the finish that is being used. A vinyl sealer works well with most oil-based finishes, while a polyurethane sealer is commonly used with water-based finishes.

Before applying the sealant, it is a good idea to do a test strip on a small area of the floor. This will help to determine if the sealant is compatible with the wood and if it will create a nice, even finish. It is also important to sand between each coat of sealant to achieve a smooth, uniform finish.

Once the sealer has dried, it is a good idea to sand the surface once more with a fine grit sandpaper. This will smooth any imperfections and ensure that the final product is even and free from any brush marks. It is a good idea to apply several coats of polyurethane to maximize the protection and longevity of the floors.

Applying the Finish

Once the stain is dry, it’s time to apply the finish. This is an important step that should not be skipped as it will create a strong bond with the underlying wood and protect the refinished surface from water, food and other household spills. It is also a great opportunity to touch up any spots where the stain was not properly mixed or applied. This should be done before you seal your floors and it is a good idea to do it a second or even third time to ensure color uniformity.

Applying the finish is a relatively quick and easy process. Just make sure the floor is clean and free of any dust or dirt particles. A HEPA-grade vacuum will help, but a good old fashioned broom should be sufficient for this step. Once again, make sure to use a broom that is not too coarse as this could damage the refinished finish. After sweeping, apply a thin coat of polyurethane with the grain and work in the direction of the grain. Allow each coat to dry thoroughly, and if needed, lightly sand or buff between each coating. You will want to wait at least 24 hours for a water-based polyurethane and a week for an oil-based one.

A few tips for this process:

-Use plastic tarps to cover any fixtures or other items that cannot be moved during the refinishing process, such as outlet covers and gaps under doors. It is also a good idea to apply painter’s tape around these areas and use latex gloves when working with the refinishing product. -Before applying each coat, use an applicator, such as a lambswool pad, a Duratool applicator or a roller to get the best results. -When using an oil-based polyurethane, you can add some additives to the product to reduce its VOC (Volatile Organic Compound) levels if desired.

While the refinishing process is going on, you should be able to live in your house as normal, although it will take some getting used to. A good tip is to put felt pads on the feet of your furniture so they don’t scratch your refinished floor.

10 Tips For Successful Hardwood Floor Refinishing

Hardwood Floor Refinishing Bergen County NJ add value to your home and are a stylish design choice. Over time, however, the wear and tear of everyday life can cause your hardwood floors to look dull and tired.

Refinishing your hardwood floors can rejuvenate their appearance, extending their lifespan and restoring their natural beauty. This article will explore the steps involved in refinishing your hardwood floors.

Hardwood floor refinishing breathes new life into old, tired floors. This intensive project involves sanding the surface to remove deep scratches and imperfections, then staining it. While refinishing isn’t easy, it is a rewarding DIY project. If you’re considering refinishing your hardwood floors, here are ten tips to help you succeed.

Before you sand your hardwood floors, it’s important to assess the condition of the wood. If the wear layer is still intact and your floors have only light, low impact scratches that don’t go all the way through the wood, refinishing might not be necessary. You can also consider re-coating your floors instead of refinishing them, but this is usually only possible if the protective layer is still intact.

If the protective layer is worn, your floors will be vulnerable to water damage. You can test for this by dropping a drop of water on the floor. If the water soaks into the wood immediately, it’s time to refinish your floors.

Start by sanding the main part of your floor using a drum or belt sander equipped with 40-grit sandpaper. Make sure to follow the direction of the grain to prevent damaging your boards. Once you’ve sanded the main area, switch to a medium-grade sandpaper for any remaining areas. Be sure to sand the edges of your floor as well.

Once your sanding is complete, vacuum the room thoroughly to remove all traces of dust. Vacuuming also helps to prevent sanding dust from being carried into the next step. If there are any stains or gouges on your wood floors, these can be filled with wood putty that has been allowed to dry before sanding again.

The final step of sanding is to use a buffer or sand-screener equipped with 120-grit sandpaper to achieve that new-floor smoothness. Be sure to also use the sand-screener on the edges of your floor to get into any nooks and crannies.

Once you’re done sanding, vacuum again and mop your floors to remove any residual dust or dirt. If you have any areas that need touch-up, you can apply a wood stain refresher or an oil-based polyurethane wood finish with a lambswool applicator. This will help your hardwood floors last longer and protect them from moisture.

Staining

Choosing the right stain for your hardwood floors is one of the most difficult steps in the refinishing process. You’ll want to choose a color that suits your home, while matching with the furniture and other design elements. Once you’ve narrowed down your choices, it’s important to test the stain on some practice boards before tackling your actual floor. Depending on the wood species, age and finish, light can have a significant impact on the final color of your stain.

Before starting to stain, make sure you’ve gathered all of your tools and supplies. Be sure to include a respirator and rubber gloves for safety. Also, don’t forget to use painter’s tape on any vents and baseboards to prevent staining them. You’ll also need to vacuum the floors to remove any dirt, dust or debris that may be present. This is an excellent time to clean up and organize your work area, as well as take the opportunity to do some light cleaning.

If you’re going for a more natural look, try to stick with lighter colors. Darker stains can be difficult to keep looking clean, and they can show scuff marks and scratches more easily. If you’re worried about maintenance, go with a semi-translucent or water-based stain rather than an oil-based stain. The latter can be extremely difficult to maintain over the long term.

When applying the stain, follow the manufacturer’s directions carefully. It’s also a good idea to start in the corner furthest from the door and work your way out, making sure you’re not leaving lap marks. If the stain isn’t the exact shade you want, apply additional coats until it is.

Another thing to remember is that stain can be blotchy. This happens when the wood doesn’t accept the stain evenly. It could be a sign that the sanding wasn’t done properly or it might just be an inherent property of the wood.

Before you stain, make sure to stir the liquid thoroughly. It’s also a good idea, especially with pigmented stains, to stir the stain before and after each application. This will ensure that the color is consistent throughout.

Sealing

As a general rule of thumb, hardwood floors should be sealed once a month. This will keep the surface from becoming dull, and it will help protect the wood from moisture and sunlight. There are several types of sealant available, and choosing the right one will depend on your preferences and budget. Penetrating sealers are popular, but they can be difficult to work with, and they will need to be reapplied more frequently than other types of wood sealants. Water based polyurethane is another common option, and it comes in a wide range of finishes from gloss to satin.

Before you can apply any sealant, it’s important to make sure that your sanded floors are smooth and free of dents, scratches, and gouges. A light sanding with a fine grade of sandpaper can help achieve this. After sanding, vacuum up the dust and wipe down the surfaces with a tack cloth to remove any remaining debris.

Once the tack cloth is dry, it’s time to apply your first coat of sealant. Use a lambswool applicator to apply the coat in the direction of the wood grain, and try to get as even an application as possible. It’s also a good idea to open any windows necessary to allow unwanted fumes to escape during this process.

After the first coat of sealant has dried, you’ll need to lightly sand it with a fine grade of sandpaper. Be careful not to over-sand, as this can damage the cured finish. When you’re done sanding, vacuum up any remaining dust and wipe down the surfaces with a clean tack cloth.

While refinishing can significantly extend the life of your hardwood floors, there will come a point when replacement is the best option. If your floors are in serious disrepair, hiring a professional can save you both time and money. They will be able to perform all of the necessary steps from sanding to staining, and they will have access to the proper tools and equipment to ensure a job well done. The best way to choose a contractor is to check their references, licenses and insurance. A reputable company should have no problem providing these details, and they will be willing to settle any customer complaints in a professional manner.

Finishing

Refinishing is a labor-intensive process. It’s best left to professionals who can finish the project in a few days, rather than a few weeks, and provide you with expert advice along the way. They’ll start by sanding the floors, using 80-grit sandpaper to remove the old coating and get the wood down to bare boards. It’s important to sand the whole floor, including the trim and baseboards, because otherwise the new finish won’t adhere properly.

Once the sanding is complete, it’s time for staining. Your flooring pro will help you choose the perfect color to suit your home and taste. They can also help you decide how much sheen, or glossiness, you want to achieve. Sheen levels range from matte to glossy, and they affect how your hardwoods look.

A topcoat protects the stain and adds a layer of shine, so it’s a vital part of your floor’s health. The most common topcoat is polyurethane, which creates a hard plastic-like surface that’s extremely durable and resistant to stains. Polyurethane is available in a variety of sheen levels, from matte to glossy, and it’s easily reapplied as needed.

Before applying the finish, your floor will need to dry completely. If you’re refinishing the entire room, this can take a few days. In the meantime, you can put down tarps and seal off the area to keep the dust out of the rest of your home. If you’re refinishing one room, it’s still a good idea to place a few doormats at the entrances to catch dirt and sanding particles that could scratch your newly refinished surfaces.

Investing in refinishing your hardwood floors can add value to your home and prolong their lifespan. It can also make it easier to sell your home when the time comes to move on. To ensure a successful refinish, find an experienced flooring contractor with a positive reputation in your community and an excellent Better Business Bureau rating. Check to see if they’re licensed and insured in your state, and make sure they have a liability insurance policy.